
How to make low poly rocks
A good low poly rock is a few large flat faces meeting at hard edges, with no dents, and a flat face underneath so it sits on the ground instead of balancing on a point. Three properties do most of the work: it's convex, it's faceted, and it's cut flat at the bottom. This guide makes one by hand in Blender 4.5, with each step checked in Blender, and then makes the same thing in the rock builder.
Why rocks look wrong
Most rocks that look off fail in one of three ways.
- A dent. A real stone can have a hollow, but a low poly rock with a face folding inward looks like crumpled paper, because flat shading shows the fold as a dark crease. Keep every face on the outside.
- Too many faces. A rock at 300 triangles looks like a lumpy ball. At 20 to 60 it looks like stone, because each face is big enough to catch the light on its own.
- A round bottom. A rock that touches the ground at one point looks dropped there. Real rocks are partly buried, so cut the bottom flat and sink it a little into the terrain.
In Blender, step by step
These steps were run in Blender 4.5, and the numbers are what came out.
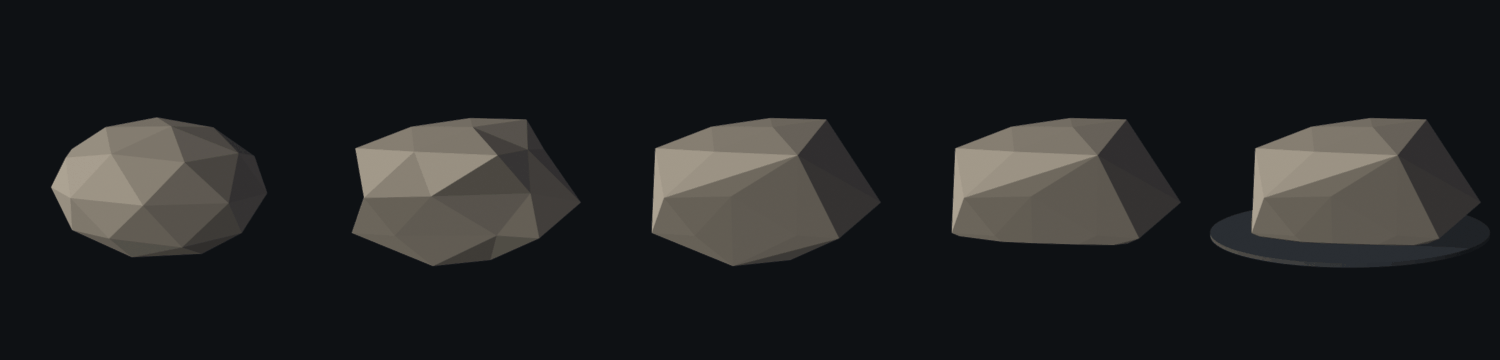 The same rock at each step, at subdivision 2 with Randomize at 0.2. From left: the squashed icosphere, still round. After Randomize, with dark creases where faces fold inward (34 of the 80 faces were dented). After Convex Hull with Join Triangles off, with every face on the outside and none dented. After Bisect, with a straight flat base. Then flat shaded and standing on the ground, at 94 triangles.
- Add an icosphere. Add, Mesh, Ico Sphere. In the panel that opens at the bottom left, set Subdivisions to 1. That's 12 vertices and 20 triangles, which is already most of a rock. Use 2 (80 triangles) for a stone you'll see up close.
- Squash it. Scale it so it's wider than it is tall, for example 1.2 on X, 1 on Y and 0.65 on Z. Flat rocks look heavier than round ones.
- Randomize the vertices. Tab into Edit Mode, select everything with A, then Mesh, Transform, Randomize. Set the Amount to 0.15 to 0.2 for subdivision 2, or up to 0.4 for subdivision 1. Change Random Seed until the shape looks right. This is what makes it a rock and not a ball.
- Take the convex hull. Still in Edit Mode with everything selected, choose Mesh, Convex Hull. Randomizing pushes some vertices inward. With subdivision 2 at 0.2, 34 of the 80 faces were dented, and Convex Hull removes them. Then open its panel at the bottom left and uncheck Join Triangles. It's on by default and merges pairs of triangles into four-sided faces, and in the test some of those came out bent by up to about 33 degrees. A bent face is split back into two triangles on export, and then it's no longer certain the rock is convex. With it off, every face in the test was flat.
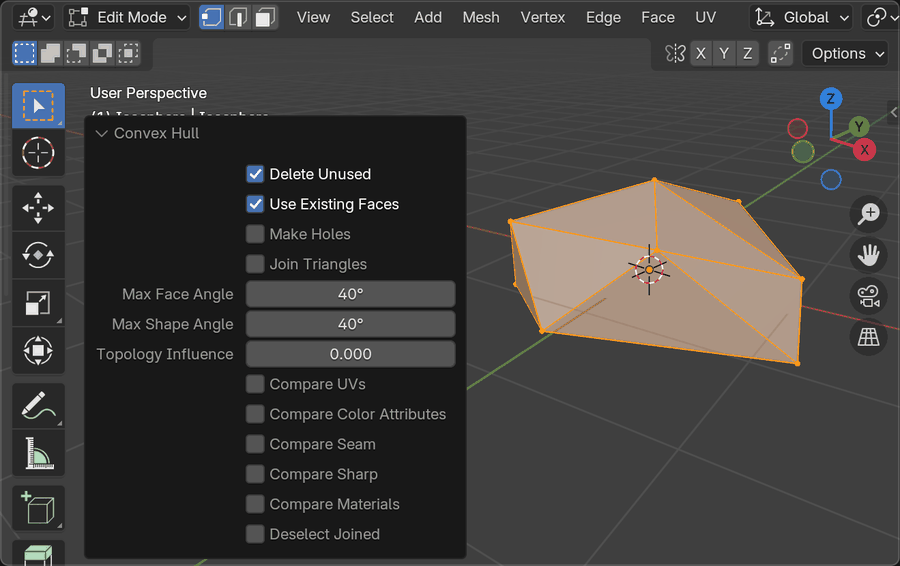
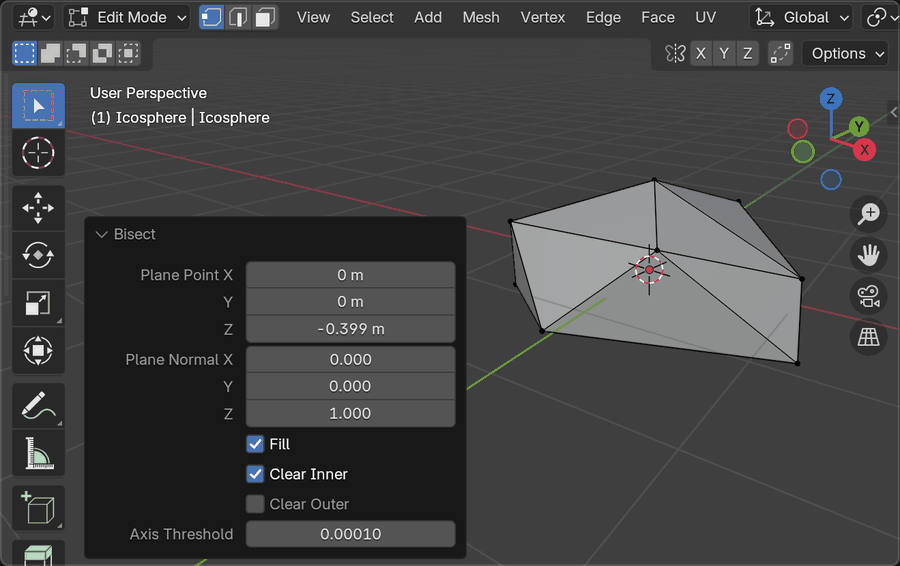
- Cut a flat base. Still in Edit Mode, choose Mesh, Bisect, and drag a horizontal line across the rock about a fifth of the way up. In its panel, set Plane Normal to 0, 0, 1 so the cut is level, and check Clear Inner and Fill. Everything below the line goes and a flat face closes the bottom. In the test the rock went from 20 to 36 triangles, mostly in the new edges around the cut, and the bottom became one flat face.
- Shade it flat. Back in Object Mode, choose Object, Shade Flat. A new primitive is already flat, but anything that went through Shade Smooth needs this, and the hard edges are the look.
- Apply the scale and set the origin. Object, Apply, Scale, so the export doesn't carry a scale the engine has to undo. Then put the origin at the middle of the base: set the 3D cursor there and choose Object, Set Origin, Origin to 3D Cursor. The rock now stands on the ground at its origin.
- Export. File, Export, Wavefront (.obj). The defaults write normals and use Y up with -Z forward, which Unity and Godot read the right way up. The OBJ guide explains what else is in the file.
For color, give the rock one material, or one block of a palette texture shared with everything else in the scene. The materials guide covers both in Unity. A single gray-brown is enough. The engine's lighting makes the faces different shades.
Reducing a rock that has too many faces
If you start from a denser mesh, such as a scanned rock or a sphere at subdivision 3, the Decimate modifier's Planar mode merges faces that are nearly flat with each other. It's better at cleaning up than at making a rock. On a sphere at subdivision 3 with a 25 degree limit it only halved the count, from 320 to 160, because a sphere has no flat areas to merge. Starting low and randomizing gives a better rock with fewer faces.
In the rock builder
The rock builder makes the same kind of rock in the browser, in about two minutes. It scatters points over a squashed sphere, or takes the corners of a block and chips each one off, and wraps them in a convex hull, cut flat underneath. There's no dent to fix and nothing to apply.
- Choose a kind: stone, boulder, slab or spire. Each opens as a finished rock.
- In Shape, choose a starting shape (a blob, or a cube, wedge, kite, diamond, hex or pyramid for broken stone), then the size, height to width, roundness and deform.
- The Seed at the top of the panel decides which rock of those settings you get. Randomize gives another one, and you can type a seed you liked to get it back.
- Cluster makes several: a heap around one big rock, a ring, or a loose scatter, with a layout seed of its own.
- On it adds moss to the faces that look up.
- Export a zip with OBJ, STL and 3MF. The OBJ is in meters, stands on the ground at its origin, and uses the shared PolyMason palette, so a rock and a tree are one material in the engine.
A boulder is about 28 triangles as proposed and a stone about 50, so they cost very little.
In the engine
Because the rock is convex, it can be its own collider. In Unity, add a Mesh Collider and check Convex. Unity limits a convex mesh collider to 255 triangles, which a rock like this is well under. In Godot, the Mesh menu can make a convex collision shape from it. A convex collider is cheaper than a mesh collider that follows every face and works with rigidbodies, so a rock can also be knocked over.
For scattering, a few rock meshes turned, scaled and tinted go a long way. Five rocks at random rotations and three sizes look like fifteen. Sink each one a few centimeters into the ground so no edge floats on uneven terrain.
The other guides
- Flat shading in Unity for low poly modelsWhy a low poly model goes smooth when it lands in Unity, what the importer's Normals and Smoothing Angle settings do, the three places you can fix it, and how to keep the colors flat as well. Three articles underneath go into the detail.
- The OBJ file format, explained for game enginesWhat's in an OBJ file and its MTL, what it leaves out (units, axes, colors), how it compares with FBX, GLB and STL, and how to import one into Unity, Godot and Unreal so the model doesn't arrive tiny, sideways or gray.
- LODs and billboards for low poly modelsHow levels of detail work, what triangle counts are reasonable for low poly trees, rocks, buildings and characters, how to make the levels so the swap doesn't pop, billboards and impostors for the far distance, and the LOD setup in Unity, Godot and Unreal.
- Free low poly assets for GodotWhere to get free low poly models that work in Godot 4, what each source's license allows, and which formats to prefer. It also covers importing an OBJ or GLB with its colors and flat shading intact, adding a collider, and scattering a forest.
- How to make low poly trees for gamesThe method behind a low poly tree that looks like its species: the silhouette that identifies it, the trunk, where the boughs leave and how the trunk divides, foliage as a few closed meshes, two greens, triangle budgets, and the export a game engine wants. The same steps work in the builder and by hand in Blender.
Or build rocks and see what comes out.